Have you ever searched for a topic in Google, clicked on the result, read halfway through, then clicked a link in the article only have it give the dreaded 404 content not found error? Of course the answer is yes, as most everyone has experienced the annoyance of broken links from time to time.
If you’ve blogged for any length of time, there’s a good chance you have broken links on your own site, and your readers are probably pretty annoyed about it. Monitoring your website for broken links is an essential part of a SEO or content audit, but it’s also a good practice to find and fix any links that no longer work as soon as they pop up. Not only will it make your readers happy, but Google likes it too!
While there are many ways to track the status of links on your site, the easiest way I’ve found to monitor, find, and fix non-working or redirected links is with the Broken Link Checker plugin. It’s a free plugin that can be downloaded from the WordPress repository, and it’s very easy to use.
While very easy to use, there are a few steps to getting it setup so that it will most effectively monitor your site and allow you to fix the incorrect links quickly.
Here’s what they are:
How to Use Broken Link Checker on Your Blog
Here’s the basic steps to monitor your site for broken links using the plugin:
- Install the Broken Link Checker plugin
- Configure the plugin settings to properly scan your site
- Scan your site for broken and redirected links
- Fix any/all links that are broken or incorrectly redirecting
Simple enough, right? Well, like most things, the devil is in the details, so lets walk through the correct way to configure the plugin so that it most effectively monitors your site.
Once you’ve installed the plugin, navigate to Settings > Link Checker in your WordPress dashboard. There are 5 tabs with setting options that you’ll want to configure. Since every site and WordPress install is different, you might need to tweak these settings a bit for your own needs, but I’ve found that configuring it in this manner uses the least amount of server resources and most efficiently tracks all the links on your blog. As you go through each settings tab, make sure to click the “Save Changes” button at the bottom of the screen so your settings will take effect.
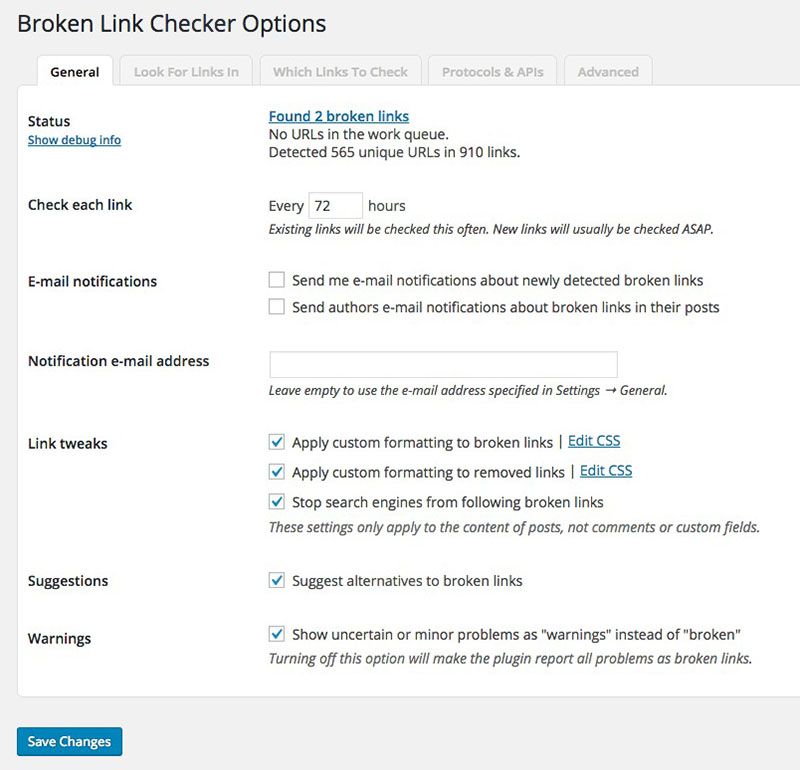
General Settings:
This tab includes all the general settings for the plugin. It has the option to change how often your links will be checked, if you want to receive email notifications about broken links, and what the plugin should do with any warnings or bad links it finds. I don’t typically opt to receive emails about newly found broken links because I’m actively monitoring my site weekly to check for them.
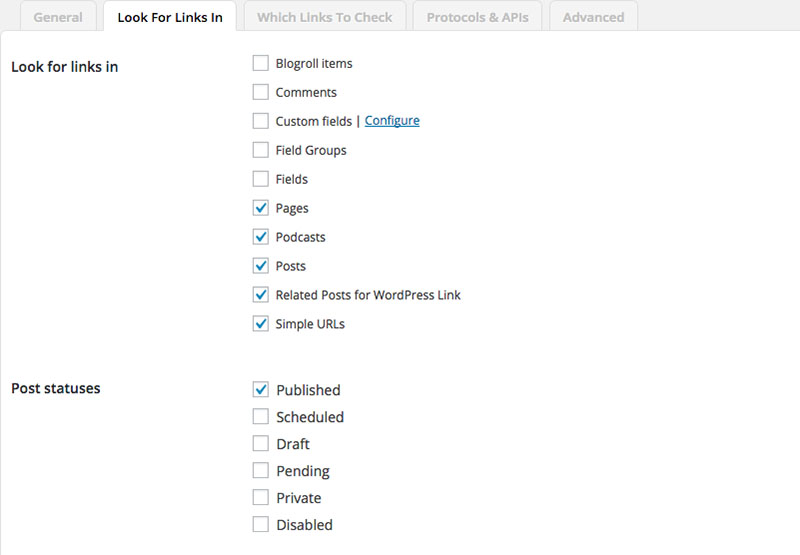
Look For Links in:
This section includes the different posts types the plugin will scan on your site while looking for links. Your display will probably be slightly different than mine, since custom post types, plugins, and other built in functionality will effect what the plugin needs to scan on your site. The first time you install and run the plugin, I’d recommend only checking your posts, pages, and any specific custom post types that are front facing and only if they have been published. You can go back and tick all the boxes once you’ve fixed any issues with these main items, but you will most likely get a lot more issues if you include comments and draft posts.
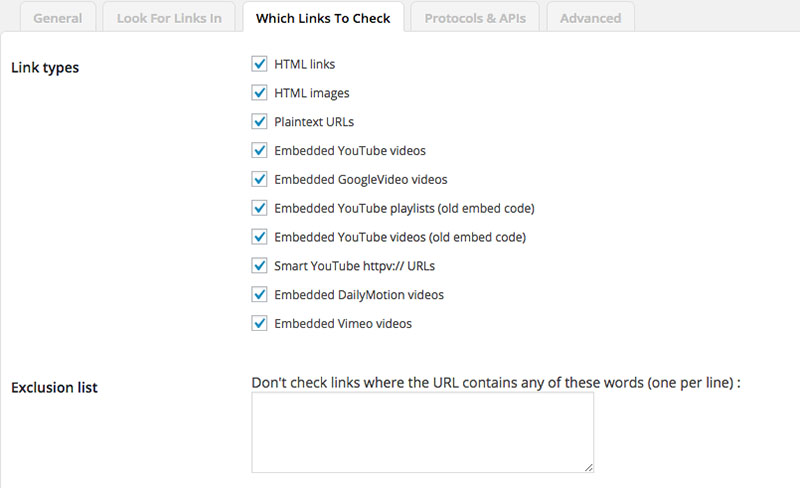
Which Links to Check:
I’d recommend checking all the boxes in this section, as the different links types listed could all find possible issues.

Protocols & APIs:
This is another section that you should tick all the boxes, as doing so will help the plugin to run more effectively.
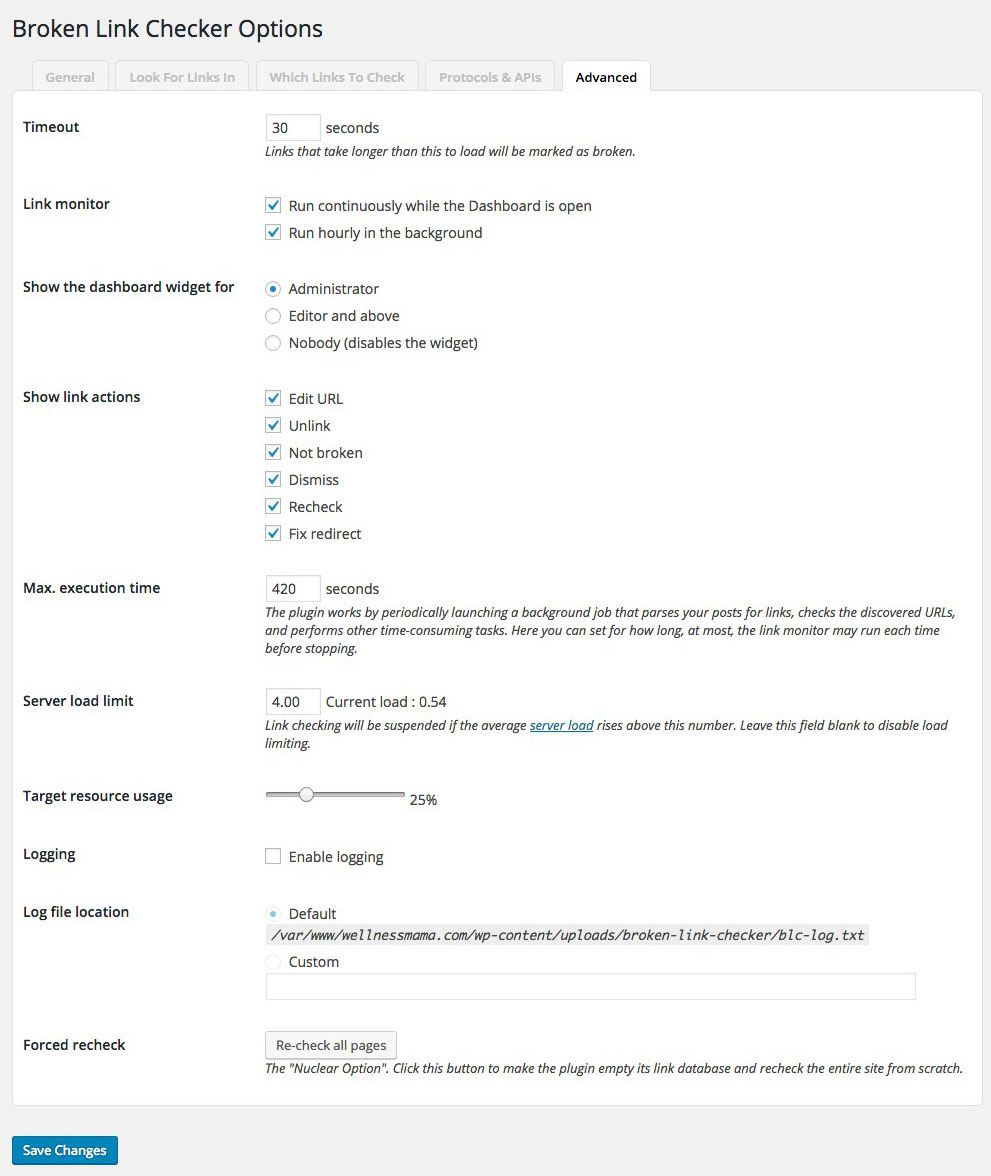
Advanced:
Under the advanced tab, most of the options *should* be automatically pre-checked, but you’ll want to make sure to check all the boxes in the “Show link actions” section. This will make sure you can automatically fix any bad links from within the plugin, instead of having to manually navigate to each post and adjust it from within the editor.
After you’ve configured all these settings, make sure you click the “Save Changes” button at the bottom of the screen. I’d also recommend double checking each tab to ensure all your settings saved correctly.
Once your settings have been saved, Broken Link Checker will begin scanning all the links on your site for errors, warnings, and redirects. The size of your blog (number of posts, pages, links, etc.) and the speed and resources of your server will determine how long it takes to complete. The larger and slower your site, the longer the scan will take.
How to Find Broken Links
Now it’s time to see what the plugin was able to find. Navigate to Tools > Broken Links in your WordPress dashboard.

Screen Options:
Before we start diving into the links, we first need to check that all of the screen options are checked off. In the upper right corner of the page, there should be a button that says “Screen Options”. Click this button and the screen will drop down. Check off every option listed. This will make cleaning up your links much easier. Click “Apply” and you’re good to go.
Now it’s time to check the link issues the plugin found. There should be 5 options: All, Broken, Warnings, Redirects, Dismissed.

How to Fix Your Broken Links
The first item you’ll want to address are, obviously, the broken links. Click the “Broken” tab and you’ll see all the internal and external links that are no longer working correctly on your site. I’d recommend fixing internal links first, since you should know if you just made a mistake when linking to another post or page, or if the item linked to has been moved or deleted. If you hover over the link in question, several buttons will appear to Edit URL, Unlink, Not Broken, Dismiss, and Recheck.
I like to click the url listed (always open in a new tab!) to make sure it really is broken. If it’s not, click the “Recheck” link. If it is broken, click the “Edit URL” link and you’ll be able to insert the correct url. Hit update and your link is fixed!
If you prefer to go into the post itself to edit bad links, you can do that as well, but I’ve found fixing the issue from the plugin to be the quickest way to fix link issues.
If you prefer to unlink the content instead of changing the location it’s linking to, click the “Unlink” button. If you go this route, I’d recommend double checking the post editor itself to make sure that no extraneous code has been left over from the old link. If the link isn’t really broken you can click the “Dismiss” button, but I’d recommend clicking “Recheck” before deciding to dismiss it.
Link Warnings:
Once you’ve fixed all the links listed as broken, click the “Warnings” tab. This section will list any links that have either timed out, displayed an error, or something else to cause it to no longer validate. Typically external links are most likely to show up here, but internal links could as well if your site is experiencing server errors or downtime of any kind. I always click the link to check there is an actual problem. If the link goes through, click the “Recheck” button. If it doesn’t, I’d recommend leaving the links alone for a day or so, in case the site linked to was experiencing technical issues and they get resolved.
Redirects:
The redirects tab can become very time consuming. You want as few redirects as possible on your site, as they utilize more server resources and will slow things down. Any internal redirects should be fixed immediately using the same steps listed above. If you are linking to affiliate products using a unique tracking code, this will often times show up as a redirect. When this happens, DO NOT edit the link to the redirected URL, as this will most likely delete your tracking code and you won’t get credit for any sales made! Instead, click the “Dismiss” button so that it no longer shows up in the redirects section. Any other internal or external links that are redirecting should be checked for accuracy and then fixed so they go directly to the correct link. (If a site has recently changed their URL structure or converted to HTTPS, you’ll often find quite a few redirects that need to be fixed.)
As I mentioned before, monitoring and editing your broken and redirected links can be a tedious and time consuming process. Bloggers and website owners are constantly changing things around on their sites, so it’s very normal to have quite a few links to fix. The first time you go through this process will most likely take the longest and by the end of it you’ll be ready to pull your hair out!
Once completed though, my personal recommendation is to keep the Broken Link Checker plugin running in the background of your blog on a schedule and check it once a week or so to correct any new issues that have popped up.
A Warning
Broken Link Checker has the reputation of being very resource intensive on your server. That was the case in the past, but since it’s most recent update it’s not quite the resource hog it once was. However, if you’re on a cheap shared hosting account, you might still experience some site performance issues when running the plugin, which is one of the reasons I recommend always using a high quality WordPress hosting provider.
Fixing all the broken and redirected links on your site can go a long way toward improving your blog’s SEO, increasing site performance, and will most definitely provide a much better user experience.
Do you audit your blog for broken links? Is there a tool or resource other than BLC that you prefer?

Thanks Seth!
I’ve been using this plugin for a while now, thanks to your suggestion. 🙂
So what about the random broken links that show up in Google crawl errors, should I go through and correct/redirect all of those? Some are posts that I deleted & weren’t redirected correctly (my redirect plugin lost some redirects once), so those I know I should fix, but a lot are odd URLs with only part of a correct link to my site in them & partly some random characters. Think I should fix those to redirect to the post it looks like the URL is closest to?
I’ve actually already redirected some of these, but if they might be slowing down my site (since you said redirects can do that), maybe I should delete some of those.
Thanks Seth!
Kelly
Hi Kelly! When you’re looking through the broken links listed by Google Search Console (Crawl > Crawl Errors), check to see where they are linked from. If it’s only showing a link from your own site, then it’s probably not as important to redirect as it is if linked to from somewhere else. An exception to this is if the site linking to you is of poor quality, then I’d probably let it continue to 404.
There is a setting in Yoast’s SEO plugin (SEO > Advanced > Permalinks) to redirect all those random characters away. It’s called “Redirect ugly URLs to clean permalinks”. That *should* take care of the issue, but can also cause other one’s, so you may need to test it to see how well it works for you.
My personal preference is to redirect everything for 6 months or so, then delete the redirects after that, as it seems to be enough time for Google to sort it out and reindex everything correctly.
Hope that helps!
Thanks SO much for your help Seth, as always you’re a sweetheart.
Kelly
Such a great post with great information for small business owners! Thanks so much!